Quick Guide To Restoring Your Bootloader
So you installed a new operating system and suddenly your boot loader is gone. In most cases the new OS is aggressive enough to make your computer boot directly to it without even making an effort to give you options for you to boot to your old OS. Worry no more, we are going to fix that now.
I will assume that have installed some sort of Linux and Windows version together, probably some newer Windows (very aggressive with BIOS boot time optimizations). First question: To which of your installed operating systems can you boot now?
Click on your answer to go to the next part:
Windows
If you can boot to Windows next part is enabling the Windows bootloader and extending it so it gives you the option to boot into other operating systems. To do that we need to download a small bootloader modification tool called EasyBCD. You can download it here: https://neosmart.net/EasyBCD/
To add Linux to your Windows bootloader menu, do the following steps:
-
Download and install the EasyBCD software. After completing the installation process run the program.
-
To add new operating system to your boot loader menu, you want to click on the third button from the top
Add New Entry. A new options panel should appear on the right side of the application window: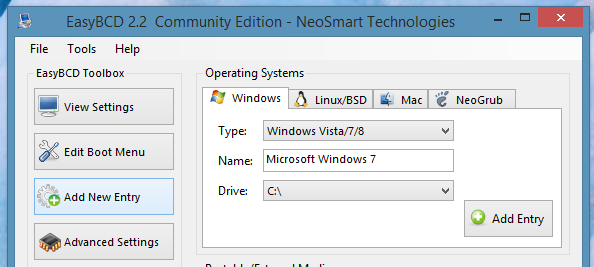
If you want to add a different Windows operating system to your boot menu, just choose the correct version and the location of the operating system in the
Drivedrop down menu. The same applies for adding the Mac operating system to your windows boot menu.For adding Linux operating system, click on the “Linux/BSD” tab and proceed to the next step.
-
In the Linux tab we first need to select the correct bootloader
Typein the drop down menu.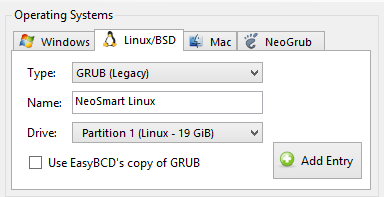
If you do not know exactly the type of your bootloader, chances are that you installed some newer version of Linux that has GRUB 2 as its default bootloader. So open up the drop down menu and select GRUB 2.
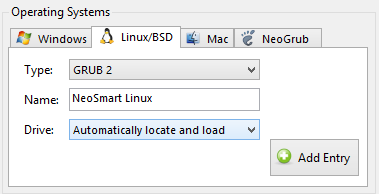
NOTE: Do not forget to change the name of your Linux distribution. You probably want to name it “Ubuntu” or “Linux Mint” or whatever you have installed instead of the default name.
-
For the GRUB 2 bootloader, the
Drivelocation does not need to be specified as we are presented with the option of “Automatically locate and load” the GRUB 2 bootloader. This is very convenient as we don’t need to know or remember the location of the bootloader or which of the operating systems we installed first.NOTE: If the situation is more complex and you have different Linux flavors installed with each having different versions of bootloader then this option may not work so smoothly
Click on the
Add Entrybutton and a success message on the bottom of the window should appear:
-
At this point you can close the EasyBCD software and restart your computer. Upon booting you should be presented with a boot menu looking like this:
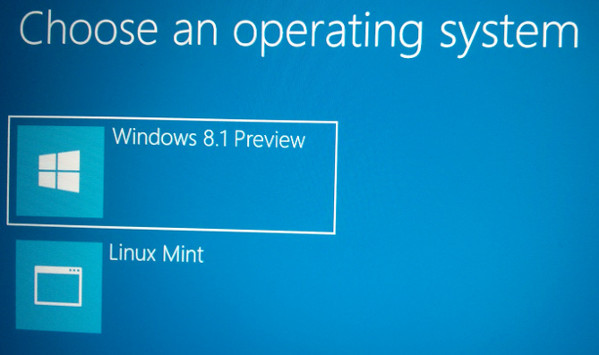
As you see I have renamed my linux boot option appropriately to Linux Mint.
Do you like this Windows bootloader? If yes, you are finished! You now have a functional bootloader and you can successfully boot into any of your operating systems.
If you don’t like it and want your Grub (or any other) bootloader back, just boot into your Linux system and proceed reading the next part.
Linux
So you can boot into Linux, great! Now let us restore the bootloader and/or insert the options for other operating systems to boot in.
If you booted to Linux by going through Windows bootloader and you prefer the GRUB as your primary bootloader, you need to restore GRUB by reinstalling it on primary partition.
Reinstalling GRUB 2
Run the following command from the terminal:
sudo grub-install /dev/sd?
? is the drive letter on which you want GRUB to write the boot information. Normally users should not include a partition number, which would produce an error message as the command would attempt to write the information to a partition.
If you are using only one hard drive or the operating systems are located on the first primary drive, you will probably use the command on drive “sda” like this:
Example: sudo grub-install /dev/sda
This will rewrite the MBR information to point to the current installation and
rewrite some GRUB 2 files (which are already working). Since it isn’t done
during execution of the previous command, running sudo update-grub after the
install will ensure GRUB 2’s menu is up-to-date.
After doing these steps your GRUB bootloader should appear first after rebooting the computer.
Adding other operating systems
If you are making GRUB your primary boot loader, you probably want to add all other available operating systems to the boot menu.
This part is easy as it does not require downloading or using any additional
tools. Only thing that we need is a text editor and your grub configuration file
path which is by default: /boot/grub/grub.cfg
Open up the grub.cfg file in any text editor (like gedit) and find the “menuentry” part. Because I have Linux Mint installed, on my machine it looks like this:
menuentry 'Linux Mint 15 Cinnamon 64-bit, 3.8.0-19-generic (/dev/sda1)' --class linuxmint --class gnu-linux --class gnu --class os {
	recordfail
	gfxmode $linux_gfx_mode
	insmod gzio
	insmod part_msdos
	insmod ext2
	set root='hd0,msdos1'
	if [ x$feature_platform_search_hint = xy ]; then
	  search --no-floppy --fs-uuid --set=root --hint-bios=hd0,msdos1 --hint-efi=hd0,msdos1 --hint-baremetal=ahci0,msdos1  77a4962b-fb54-4054-ae57-c2292a4fae45
	else
	  search --no-floppy --fs-uuid --set=root 77a4962b-fb54-4054-ae57-c2292a4fae45
	fi
	linux	/boot/vmlinuz-3.8.0-19-generic root=UUID=77a4962b-fb54-4054-ae57-c2292a4fae45 ro   quiet splash $vt_handoff
	initrd	/boot/initrd.img-3.8.0-19-generic
}
To manually add a Windows boot option you want to add the following text to your file just after the previous part:
menuentry "Windows 8" {
	set root=(hd0,3)
	chainloader +1
}
As you see I have added a menu entry named “Windows 8” and the very important
part here is set root=(hd0,3) which means to boot the windows operating
system from the hard drive 0 (which is the first and only one I have on my notebook)
and that it is located at the third(3) partition. For more understanding here is
how my disk looks like:
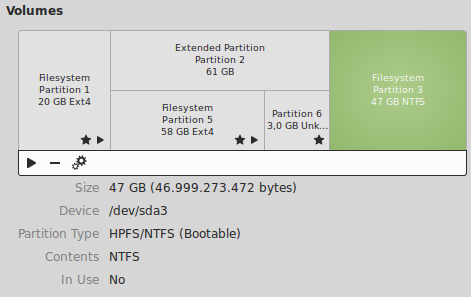
For example if you need to boot your windows XP which is located on the second hard drive, on the first partition you would want to add to grub.cfg something like this:
menuentry "Windows XP" {
	set root=(hd1,1)
	chainloader +1
}
After adding the new entry in the grub.cfg file, don’t forget to save it! Next time I booted my computer I was presented with boot menu looking like this:

Disabling the GRUB boot menu
If you want to use windows bootloader as your primary boot menu, you probably don’t want the GRUB bootloader appearing right after you choose Linux in your Windows bootloader. To disable the GRUB boot menu, do the following steps:
- Open the file
/etc/default/grubwith text editor with elevated rights. You can do that by opening the terminal (Ctrl+Alt+T) and executing:sudo gedit /etc/default/grub - Find the line that contains the
GRUB_TIMEOUTvariable and set its value to zero. It should look like:GRUB_TIMEOUT=0Do not forget to save the changes! Next you need to open the terminal once again and execute the following command:
sudo update-grubThis should apply the changes and completely disable the display of the bootloader menu.
Disabling the Windows boot menu
By deciding to have GRUB as your primary boot loader, you probably want to skip the windows bootloader after selecting the windows in the GRUB boot menu. In the process of restoring your GRUB bootloader you may have needed to enable the windows bootloader but now when you got what you wanted, the appearing of the unnecessary windows bootloader is just plain annoying. Disabling it is quite easy. Just follow the steps below:
-
Boot into your Windows and run the EasyBCD software once again. This time click on the “Edit Boot Menu” button.
-
The following menu should appear on the right:
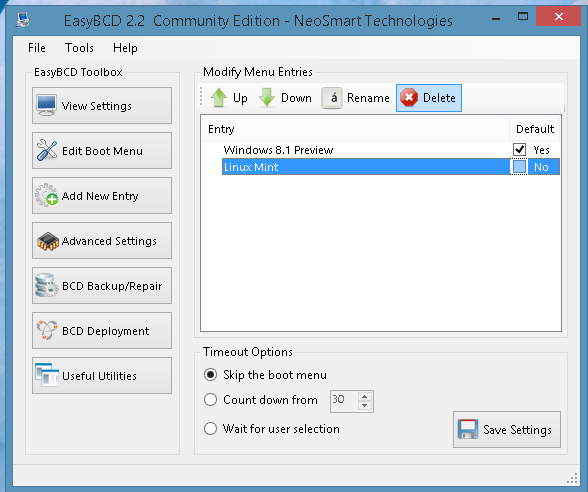
To completely skip the windows bootloader menu select the “Skip the boot menu” in the “Timeout Options” list under the list of menu entries. Additionally you may want to delete the unnecessary entries in the list by selecting them and clicking on “Delete” button.
Finally just click the “Save Setting” button and you are all done!
After restarting there should be no more windows bootloader menu.
I can’t boot to anything
In this case it is advisable to make yourself a bootable Linux USB drive (I recommend https://grml.org/ but Ubuntu will work fine) and boot into a live Linux on your computer. Then you could try to fix your GRUB bootloader as described in the Linux section above.